Import
Importing data enables you to fill the required data in your app quickly and easily.
You don’t have to input all of the data for your app manually one by one. If the data you need is already input in some way in a computer file, you probably can convert it to a CSV file (Comma Separated Values Files). This is a very popular format as it is very simple and allow most application to exchange information in a somewhat standard format.
The button navigates to the import page for the data type you are viewing. You may also find an Import data menu item in the main app menu.
Importing data in Simitless is a 4 steps process
Import steps indicator

1. Select the data source
Import steps indicator
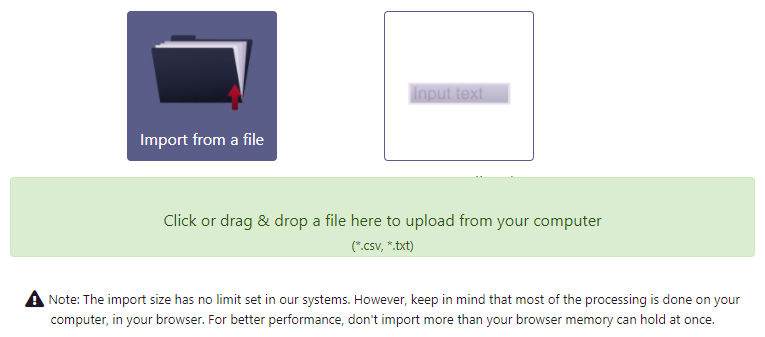
To import data, you can select a text file or directly paste text in a text box. Both are processed the same way after, it just avoids having to create a new file on your computer if you can just copy the data from another source.
Your CSV file can have title for the columns. This makes things easier in the later steps, especially if the name of the columns matches the data field name in your app. However, this is not necessary and if your file contains only data without columns titles, the platform will still be able to process it.
Click the Next step button to proceed with the destination selection.
2. Select the destination
The next part is to select the destination data type for your data. You can only import in one data type at the same time for now. If you navigated to the import tool through a data type, it will be pre-selected. Otherwise, you need to select one.
At this point, you can perfectly select a sub-type if you have any in the application. A parent data record is required to be selected for a sub-data-record to be created. There is a mechanism in the next step to handle this case and select one or multiple parent records.
Again, simply click the Next step button to proceed with the settings.
3. Configure import Settings
Quota estimate
Adding data will use more quota in your applications. Adding a lot of data at once might get you over your quotas. If the quotas are reached during import, the last lines of import will not be added to your app.
This is why the import tool calculates an estimate of the import volume and shows you how it compares with your current quota. In addition, there is a direct link to “Manage your workspace plan” on this page. You can navigate to the workspace management and come back to the import tool after. As long as you don’t cancel the import, start another import, or close the window, your current import operation should remain in memory.
At this point, the size of your import is only an estimate because, especially in the case of long imports, the importing files can be very big and long. The import system just previews a few lines of your dataset and estimates the rest. Everything will be processed through streaming the file, to minimize memory impact on your computer.
Fields selection
When opening the settings section, the platform automatically selects the most likely field for each of the column in your dataset. This selection is based on the name of the column.
You can then modify the selection to select and unselect, and even create a new data type.
The second line in the table, just below the table header is a row of buttons. Those let you select the import target settings. Clicking on the button for each column opens the selection menu. There you can:
- Decide not to import: Do not import
- Create new data type: Create new data type
- Pick an existing field: Data Type Name You can import only one column into one data type. The standard data conversion will apply from text to the type of data you selected. The table will display the result as an interpreted value when selected or raw text value when not importing.
- Parent record identifier: Parent record identifier indicates that the columns contains an internal record identifier for a specific parent record.
Toolbar
On top of the import table preview, the toolbar proposes 4 action buttons:
-
Cancel changes: re-initializes the import preview and settings to the automated options selected when first opening the page.
-
Create all missing fields: prepares the creation of new text fields for all the unallocated columns. The actual fields are created when processing the import. This is just a provisional setup informing the import process.
-
Clear new fields: removes all the new fields that were asked to be created. Cancels the information to the import process. No actual fields are deleted.
-
Select a single parent for all the records (importing in nested objects only) : All of the record is this import will be created under a single parent record if the type you are importing into is a sub-object data type.
Advanced options
A few advanced options are giving more information to the import data parser:
- Quote character: Indicates that the quote character is used to delimit values when the value also contain the separator within.
- New Line Separator: What character separates the rows [auto, \r, \n, \r\n].
- Delimiter: What separates the values [empty=auto] To input a tab, we added a small link below the input field as the tab character cannot be easily input using the keyboard in a web environment.
- First Line Header: Indicates if the first line is a column header or if is it data already.
- Comments: The character provided in this field indicates that lines starting with this character should be ignored by the import parser.
- Encoding: The parser is able to read most current and common file encoding. In some case it will attempt but the user should check the result in the preview.
List of encodings from specs https://encoding.spec.whatwg.org/#utf-8
- UTF-8
- IBM866
- ISO-8859-2 (latin 2)
- ISO-8859-3 (latin 3)
- ISO-8859-4 (latin 4)
- ISO-8859-5 (cyrillic)
- ISO-8859-6 (arabic)
- ISO-8859-7 (greek)
- ISO-8859-8 (hebrew)
- ISO-8859-8-I (logical)
- ISO-8859-10 (latin 6)
- ISO-8859-13
- ISO-8859-14
- ISO-8859-15 (l9)
- ISO-8859-16
- KOI8-R
- KOI8-U
- macintosh
- windows-874 (iso-8859-11)
- windows-1250
- windows-1251
- windows-1252 (iso-8859-1)
- windows-1253
- windows-1254 (iso-8859-9)
- windows-1255
- windows-1256
- windows-1257
- windows-1258
- x-mac-cyrillic (x-mac-ukrainian)
- GBK (Chinese Simplified / iso-ir-58)
- gb18030 (Chinese Simplified)
- Big5 (Chinese Traditional)
- EUC-JP (Japanese)
- ISO-2022-JP (Japanese)
- Shift_JIS (Kanji)
- EUC-KR (Korean)
- iso-2022-cn (replacement)
- UTF-16BE
- UTF-16LE
- x-user-defined
Importing data fields from a text file treats all the values as text input. To match the destination field, if the field is not a text field, the values are processed through the platform converters. When a target field is selected, the preview shows the output of the converters.
Once you are happy with the preview, click the Next step button to open the confirmation screen. If some settings prevent the import, the next buttons are deactivated, for example, when no parent record instruction is selected in a nested data type import. The field import settings button lets you select import processing options. This is especially useful when the import values are dates.
Similarly to the internal library for date management momentjs, when importing a date, we first check if the string matches known ISO 8601 formats, we then check if the string matches the RFC 2822 Date time format before dropping to the fall back of the standard javascript new Date(string) if a known format is not found.
The format representation of the date uses key letters to represent the position of the information. For example: “DD MM YYYY hh:mm:ss.
| Input | Example | Description |
|---|---|---|
| YYYY | 2014 | 4 digit year |
| YY | 14 | 2 digit year |
| Q | 1..4 | Quarter of year. Sets month to first month in quarter. |
| M MM | 1..12 | Month number |
| MMM MMMM | Jan..December | Month name in locale set by moment.locale() |
| D DD | 1..31 | Day of month |
| Do | 1st..31st | Day of month with ordinal |
| DDD DDDD | 1..365 | Day of year |
| X | 1410715640.579 | Unix timestamp |
| x | 1410715640579 | Unix ms timestamp |
The more complete documentation is available in the momentjs documentation.
4. Process the import
The final confirmation screen is simply a big button to confirm import. At this point you still have the choice to cancel the import using the small link on the top right-hand side of the screen.
The following button will launch the import process.
Your browser is doing the file reading and parsing so you must leave your browser open while the progress bar is not indicating completion or the import will only be partial.
Until the completion of the import process, the number of rows and new quotas used is only an estimate as importable files can be large, they are streamed through the process. This means they are not read all at once, but by small chunks.