Access Management
Access rights and roles in Simitless are very granular. This means it can be finely tuned to match the exact access requirement for each user of your applications.
Access rights
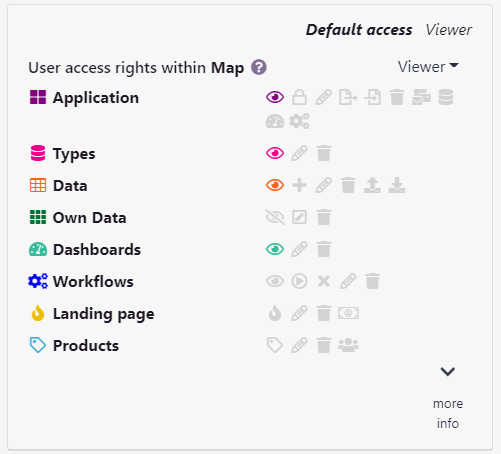
Access rights are defined by the platform in terms of what a user can do with the application or data type. The access rights that can be enabled or disabled are:
- Application
- View the application
- Manage user rights and approve users wanting rights on the application
- Edit the application
- Export the application settings and data
- Import and override the application settings and data
- Delete the application
- Email from the application
- Create a type in this application
- Create a dashboard in this application
- Create a workflow in this application
- Types
- View the data type
- Edit the data type
- Delete the data type
- Data
- View the data
- Create data
- Edit data
- Delete data
- Import data
- Export data
- Own Data
- View the data that was created by the same user
- Edit data that was created by the same user
- Delete data that was created by the same user
- Dashboards
- View the dashboard
- Edit the dashboard
- Delete the dashboard
- Workflows
- View and work on the workflow
- Start the workflow
- Cancel the workflow
- Edit the workflow
- Delete the workflow
- Landing page
- Create a landing page in this application
- Edit the app landing page
- Delete the app landing page
- Publish the app landing page
- Products
- Create a product in this application
- Edit products
- Delete products
- Manage application prospects for the products of the app
Access rights can be granted by default to a user or after a user is given access to an application. Access rights are granted to users on an individual basis.
To manage access more globally, the administrator of an application can create roles.
Application default access rights and roles
Access roles
Roles are a collection of access rights that apply to users. They can be granted by default or added to a user after the user is given access to an application.
Access roles can be defined by the application creator as well as any user with the “Manage user rights and approve users wanting rights on the application” right. In the menu for the “Default access” definition, a mini-form let’s you type in a role name. Click the to create a new role. By default and to simplify things in most cases, applications have 3 roles:
- Admin: All rights possible (except “Own-data” rights as they override and restrict the “data” rights)
- Editor: All the necessary rights to edit data. They can create data records and modify them in the entire application. They cannot edit the application structure or rights. They can send email from the application when it is configured. They can also launch workflows. and view dashboards.
- Viewer: Can only view the data but cannot edit anything. They can also view dashboards, but not workflows.
You can modify the defaults and the existing rights of anybody at anytime. Effects should be instant. In most cases, their screen updates itself, if they are connected to the platform.
Default access rights
The default access rights will be granted to users with the selected role in your application. Those should be the basic access rights that everybody using your application should have. By default, the viewer role is selected.
You can add default access rights for new users in 2 ways :
- Direct access: select the icons corresponding to the rights you want to grant to the new users arriving in your application
- Roles: tick the box next to the name of the role defined the application, in the default access zone.
The first line of the Default access box shows a summary of the currently defined default access selection.
Default rights and roles are added to users when they join the application. Changing the default rights are not changing any of the existing user rights. Roles are granted to users the same way, however, rights that are defined in roles will change the access level of users that currently hold this role.
Application Invitation email prompt

Invitations
The invitation box lets you send an email invite to any email address, whether they are existing users or new ones. The platform will send an email with a code to the new user. They are free to reclaim the invitation with the account of their choice as long as they can provide the email address the invitation was sent to and the invitation code. If the email address you sent the invitation to is associated with an account and validated on the platform, the user will be shown the invitation and a notification directly in their Simitless account.
Application Invitation
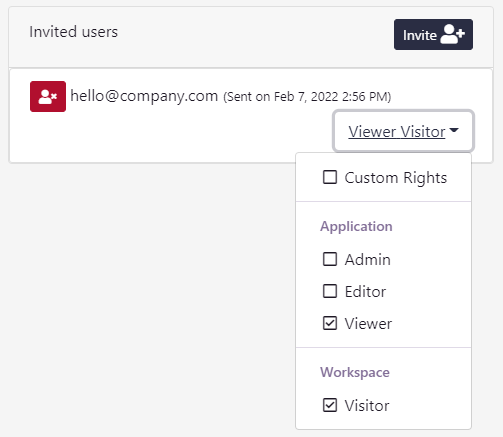
To send an invitation, click on the button Invite . An invitation is created with the default access rights and roles.
You can modify the access rights and roles offered in the invitation until the user reclaims the invitation. After that, the user is a member of the application. You can then handle their rights directly in the user management section. You can revoke the invitation at any time, before it is reclaimed. The user will be notified of the change and won’t be able to reclaim the invitation.
Application Access Request
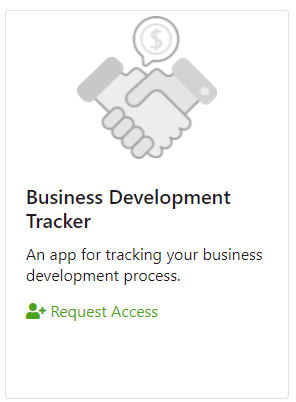
Access Requests
When a user is a member of the workspace but not of the application you are currently editing, and the application is listed in the workspace, the user is presented with a button Request Access to request access. The administrator will receive a notification and a new box will appear to list the requests in the user management section. From this box, the administrator of the application can accept or reject the request. A notification will then be sent to the user to let them know of their status.
User Management
The user management section of your application edition lets you view the complete list of application members. Each user has a line with:
Application User Management
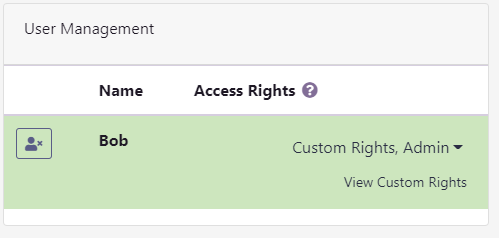
- their name to identify them (hovering with your mouse over their name on the web desktop view also shows you their username);
- a button to remove them from the user list (all rights are then removed);
- a dropdown to select roles or custom rights;
- a “view Custom Rights” link to display the custom rights icons to toggle them for this user;
Sorry, you cannot leave just yet.
When an administrator for an application attempts to leave the application, the platform will refuse, to avoid applications being abandoned and everybody being locked out.
The following message will be displayed to inform the administrator (current user):
Sorry, you cannot leave just yet.
As an admin of your app or workspace, you cannot just leave it. Head to the Management page of your app or workspace and transfer admin duties to some other user or delete your workspaces if they’re not going to be any use anymore.
Users with the right to change other user rights (like application admins) cannot unsubscribe either. Make sure that you give that responsibility to somebody else and get it removed from your own user before you can leave the application.
To be removed as an administrator, grant the rights to another user. They can then remove you from being an administrator. If you do not need the application anymore, simply delete it.
Workspace central apps management
Each application has their own page to manage user access but to make it easier, we have grouped the settings on the workspace page as well. From your workspace user management, you are able to access the same information, but for all the applications of your workspace at once.
One of the most practical effect of this is that when you add a user to the workspace, you can grant them access to each application without needing to navigate to each of the application user access management page.