Build your own app
Get your Simitless app working the same way you work.
Working efficiently with any system requires you to understand and identify you own way of working. Each step of your process requires various data to be input. All this data, once grouped and structured will give you the information you need to make the right decision for your activity.
In a Simitless app, you can hold in a single place all the information you need to inform your decision, based on your own way of working. Let’s look at how you work and how it can be translated to an app.
1. Define your goals
First, let’s define your goals and their contexts. Then, we’ll be able to draw some steps that will formalize your own way of working. Let’s consider the following statement:
I need to [...] when [...] so that [...].
This sentence is used to explicit 3 things:
- What you need to do
- When you need to do it
- How you will observe the result of your action.
Goals Examples
If you’re a trainer:
I need to store my customer information when I have a contact with them so that I can reach out to them efficiently and regularly.
If you’re an online seller:
I need to track the order information when I receive orders so that orders are processed timely and delivered to customers promptly.
If you’re a business:
I need to know the current project status when a project changes so that I can follow up with customers, prospects, leads, billing, etc.
2. Identify your information need
Once you know what you need, it’s much easer to identify the information you need to work on that task. For your need, identify the main information topic that you need.
Then, for that topic, identify the key data that defines this topic.
Needs Examples
Customer (name, email and phone details)
Order (Description, Origin of order, amount, shipping tracking, Customer [Name, delivery address] )
Project (name, code, estimates, bills, customers)
3. Make it a structure
To build a structure for your data, you start with your main topic. In your Simitless app, it becomes a data type object. From there, you are going to build a tree-like structure to define your data structure.
Objects in Simitless are data types that contains more data types, fields or objects. Each new field or object becomes like a branch, generating a tree-like structure.
Structure Example
- Customer
- name
- phone
- Order
- Description
- Origin of order
- amount
- shipping tracking
- Customer
- Name
- delivery address
- Project
- name
- estimates
- bills
- customer
4. Expand your structure
You may notice this is a definition work. You start with an object and you try to define what part of it should be defined in term of smaller bits of information. You should continue to define your objects in a tree, until you have a single data value for each of the as final leaves.
At this point, try to still focus on the information you need to complete the job this structure is designed to keep track of. The entire focus is still on your own way of working.
Expanded Structure Example
- Customer
- Name
- Phone
- Category (Professional, Private, State)
- Company
- Name
- Address
- Website
- Order
- Date received
- Description
- Article link (origin of order)
- Amount
- Shipping tracking number
- Date sent
- Payment status
- Customer
- Name
- Delivery address
- Billing address
- Project
- Name
- Start Date
- Due Date
- Estimate
- Date
- Work details
- Amount
- Main Contact (Customer)
- File (PDF)
- Approved status
- Bill
- Date
- Agreed estimate
- Work details
- Amount
- Main Contact (Customer)
- File (PDF)
- Customer
- Name
In Simitless, a single value is held in a data field type. A data field type is typically some data that will hold in the form of a line of text, a number, a date. For example, a name can be represented by a text so it is a single value. A subscription date is also a single value.
You can find a list of objects data types as well as fields data types in the data structure platform documentation. You don’t need to identify your data field types settings yet. For now concentrate on your own structure.
5. Make it a practical structure
You have defined your structure, now it is time to think of the information that will be reusable or used in a single place. Let’s have a look at any sub-object in your data trees. For each of them, are they re-usable? Or duplicated across multiple structures? Is it going to changing its details over time? In those cases, the object may be pulled up to be a main data type in its own right and simply linked.
Another element to consider while choosing between a selection list and a main object is who will be editing the information. If the users editing the information need to be able to change the data, a main object may be more suitable. If the list of choices in the list should be only modifiable by an app administrator, someone that can change the structure of your information and has the authority to change the ways your organization works, then it should probably be a selection list.
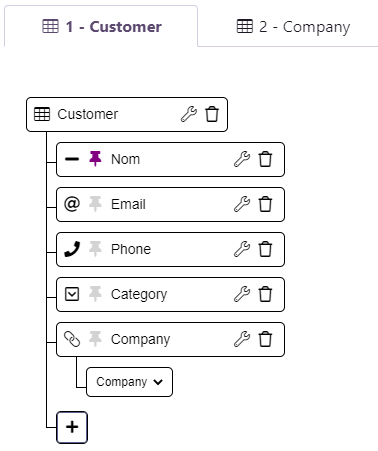
Practical Structure Example
In the case of our Coach, the Company may be the same for multiple Customers over time. Hence, we are going to pull it up to the main object level. Differently, the Category field is unlikely to change over time. Some categories may be added, modified, or removed, but it is unlikely to happen very often once well chosen. We are then deciding to keep the category at the same level and to make it a simple selection list.
- Customer
- Name
- Phone
- Category (Professional, Private, State)
- Company (Link)
- Company
- Name
- Address
- Website
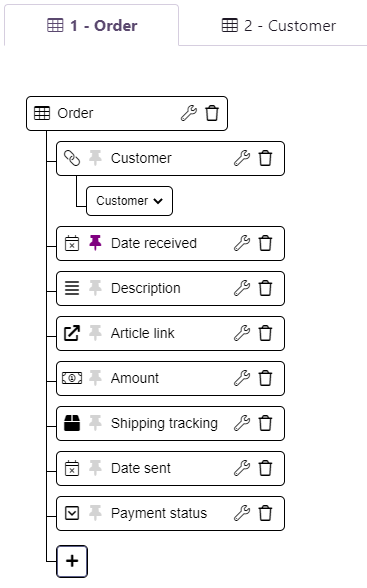
In the case of your Seller, a customer may create multiple orders over time. This is why we create a separate data type for Customers, independent to the Orders so that customer records can be reused in multiple orders.
However, the customer Addresses are unlikely to be reused over different customers. We can keep it simply listed within the Customer record type.
You may notice there are two different addresses. Why do we not make one type of records as the information is duplicated. We could. This would also enable having more types of addresses (delivery, billing, estimate, representation, etc.). However, it would add a level of complexity in your data structure, without much practical gain in terms of usability. Try to keep it simple, and simple here means, with as little levels and fields as necessary. You can always add some later.
- Order
- Date received
- Description
- Article link (origin of order)
- Amount
- Shipping tracking number
- Date sent
- Payment status
- Customer
- Customer
- Name
- Delivery address
- Billing address
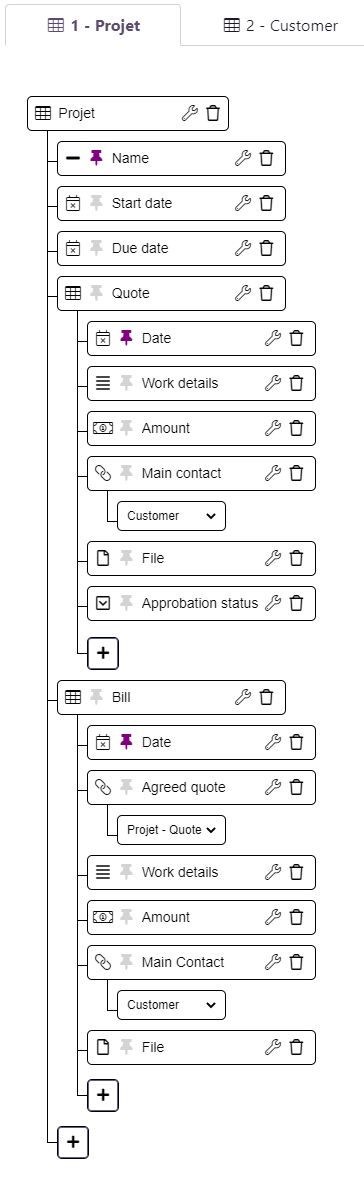
In the case of your Business management app, there is already quite a bit more happening. Estimates and Bills are definitely tied to a Project, however, a Customer may be linked to many projects. You may even find the case where there are more than one customer on the same Project. We hence set the Customer data type to the base level to make it a main data type, but we are keeping Estimates and Bills as sub-objects of a project. They will not be changing project ever once defined.
Since, on a Project, only one customer can be the recipient of a Bill or a Estimate, let’s make those a link to the Customer record. We don’t want to type again the customer details for each bill.
- Project
- Name
- Start Date
- Due Date
- Estimate
- Date
- Work details
- Amount
- Main Contact (Link to one Customer record)
- File (PDF)
- Approved status
- Bill
- Date
- Agreed estimate
- Work details
- Amount
- Main Contact (Link to one Customer record)
- File (PDF)
- Customer
- Name
There are no wrong answers. All the choices are mostly tradeoffs based on how you decide you want to work.
6. Choose you data types
You can find a list of objects data types as well as fields data types available in Simitless, in the data structure platform documentation.
For each of the data types you have defined in your tree, you can now go ahead and choose what kind of data should be stored in that field. The data type will create help present your data in a more easily usable way in your app.
Objects data types are likely to be all tables, to start with, unless you have specific needs for functionalities such as a Calendar, a Map, or an Image Gallery, for example.
Fields data types can take many forms. The main types of fields data types are either text, textblock, email, phone, number, date or value selection. You can find a full definition of every data types in the fields data types documentation page but it is probably enough for now to define what globally is the kind of data for your field.
Data Types Example
- Customer [Table]
- Name [Text]
- Email [Email]
- Phone [Phone]
- Category [Value selection] (Professional, Private, State)
- Company [Link] (Company)
- Company [Table]
- Name [Text]
- Address [Text block]
- Website [URL]
- Order [Table]
- Date received [date]
- Description [Text block]
- Article link (origin of order) [URL]
- Amount [Money]
- Shipping tracking number [Parcel]
- Date sent [Date]
- Payment status [Value Selection]
- Customer [Link] (Customer)
- Customer [Table]
- Name [Text]
- Delivery address [Text block]
- Billing address [Text block]
- Project [Table]
- Name [Text]
- Start Date [Date]
- Due Date [Date]
- Estimate [Table]
- Date [Date]
- Work details [Text block]
- Amount [Money]
- Main Contact [Link] (Customer)
- File [File] (PDF)
- Approved status [Value Selection]
- Bill [Table]
- Date [Date]
- Agreed estimate [Link] (Estimate)
- Work details [Text block]
- Amount [Money]
- Main Contact [Link] (Customer)
- File [File] (PDF)
- Customer [Table]
- Name [Name]
- Email [Email]
7. Create your data structure in Simitless
You are now ready to create your data structure in your Simitless app. If you have not yet done it, create an empty application and add new data types matching your design.
Data Types Creation Example
Coach structure creation
Seller structure creation
Business structure creation
8. Add bells and whistles
Now, you can start using your application already, the basics are there. However, to go further, you can also spend a bit more time on your app design and refine its functionalities.
Data quality, data type settings
To enhance your application behavior, improve on the interactions you have with your app as well as reduce the potential for input errors, the Simitless platform provides the following tools:
- Constraints: Constraints help you make sure that the data that is input into your app is matching what is expected. It helps improve your app data quality and consistency. Simple constraints are like a search filter that helps you make sure that the data that is input into your app is valid. The required fields constraints disable data fields when other fields don’t meet pre-defined conditions. The value requirements constraints let’s you define specific requirements for specific values.
- Calculation formulas: Some times, fields don’t have to be manually input into you database. If you can think of any way to automate the calculation of their value, you’ll gain even more time. Calculations formulas can be triggered through an automated calculation on each data change, or as a default value for the field, calculated only when creating a new record, or again, as a manual operation by a user.
- Data Types Settings: Each data type has a specific purpose and requires, then, a specific behavior and presentation. The platform gives you multiple options for every data types. The data types settings include Listing Behavior, Input form Header settings, Data Listing Display settings, Data Quality options, Display Behavior settings, and Form Positioning parameters, to finely tune how your applications behave.
Tools
- Email sending: If you want to send emails from your app, you can set the Email Sending settings in your app and enable a SMTP server to handle your outgoing emails for your application. This is used for the example of the Coach. Our Coach is able to broadcast their newsletter directly to all of their customers without having to send messages one by one or even by using the bcc email field (which reduces deliverability of your messages). For that there is the bulk email sending tool, directly built in your application.
- Transform templates: Transformation templates lets you define document templates for transforming records into prints, documents or exportable text. This is used in our Seller and Business examples. Each of them is able to create printouts of their company activity and deliver it to their accountant every month.
9. Identify your information flow
Finally, you can go even further, especially if you are building an application for multiple people to use. If you do everything yourself, alone, you may not need to do any of it but as soon as multiple people joint, it will be useful to define roles to strengthen security and improve on data quality.
Who does what?
You can identify the roles of people working on your app by defining your information flow. Typically, in an application, there are distinct times when data is either input or consumed.
To proceed and inform this step, you could take the following sentence, and, for each step of the information processing flow, repeat it:
[...] records are [created, used, updated, exported, imported, deleted] by [...] when [...].
Roles definition Example
Editor role, with rights to send emails
and delete only their own records
- Customer records are created by the coach when meeting a new customer.
- Customer records are created by the assistant when processing an incoming message.
- Customer records are used by the assistant when sending a promotional message.
The coach inputs data when they get information about customers, whether through email, in person, on the phone. They then use the customer information when sending out messages for prospection, marketing, or direct messaging. As there is only one person using the application, and this person does both input and exploitation of the data, no additional role is necessary.
If our coach were to hire an assistant tasked with inputting the data and sending communication to customers, we could create, or modify an editor role that would have the rights to edit records and send emails in the application. They however would not be able to modify the structure of the application as the application creator is able to.
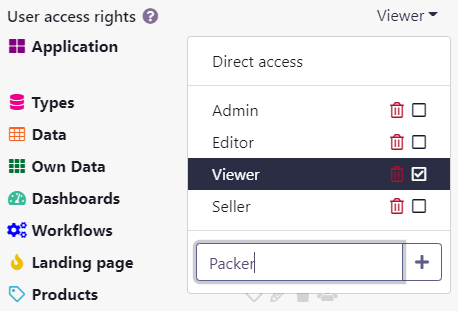
Seller and Packer roles creation
- Order records are created by the seller when receiving a sale notification from the online shop.
- Order records are used by the packer when packing a parcel.
- Order records are updated by the packer when sending a parcel.
An independent seller might be able to do everything on their own, without specific roles, but as the company progresses and the team expands, the roles of each team member might become more specific. A sales associate might be specialized in taking orders while a packer might deal with the shipping only.
Depending on your tolerance and trust, you might just use the editor role for them as it lets them edit the data, but not the app data structure. Every user should have their own account anyway and it won’t cost anything more to have more accounts on the platform (billing is per seat using the apps at the same time, regardless of the overall number of user you register).
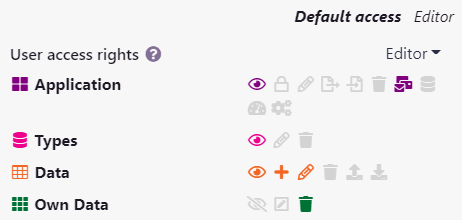
To specialize the roles better, you could create a new role for the seller and another one for the packer. Then, for each of these roles, you can define the overall rights to edit the data, globally in the application, or you can select the override option in specific data types (both for objects and fields) and, for each role, select the associated rights such as being able to view or edit the values or event being able to create and delete records.
Our Business example could have multiple possibilities to work, depending on your real-life situation, your employees or your team members. Here is one possible way to view this situation.
- Customer records are created by the account manager when establishing the first contact with a customer.
- Project records are created by the account manager when responding to enquiries about projects by a customer.
- Estimate records are created by the engineering manager when analyzing the project requirements.
- Estimate records are updated by the account manager when receiving the customer validation.
- Bill records are created by the finance operative when accounting for the engineering time.
This custom business information system enables 3 positions to interact to serve more efficiently their customers:
- The account manager,
- The engineering manager,
- The finance operative.
Depending on your operating practices, you might just use the editor role for them as it lets them edit the data, but not the app data structure. Every user should have their own account anyway and it won’t cost anything more to have more accounts on the platform (billing is per seat using the apps at the same time, regardless of the overall number of user you register).
To specialize the roles better, you could create a new role for each of the type of users that has access to your information system. The platform will track who does what anyway, so you won’t be left wondering why some data changed at any point. However, you can prevent some users from updating or accessing specific types of records.
For each of the roles you want to create, you can define the overall rights to view, edit or delete the data, globally in the application, or you can select the override option in specific data types (both for objects and fields) and, for each role, select the associated rights such as being able to view or edit the values or event being able to create and delete records.
Invites your users
Once you have defined the data structure and the roles for the information flow through your application, it’s time to start working with it. Send invitations to other users to join your application by creating and verifying their account.
Each user gets their own account in Simitless. Sharing account is discouraged as it prevents the full security of your systems from working correctly. Unlike many of the software system existing today, the cost associated with the applications quotas in Simitless is not related at all to the number of accounts you create. You only pay for simultaneously connected users. We call them “seats”.
10. Views, Perspectives
You can go further and create a main screen for your application. Our documentation explains on the App main screen goes over all the possible options, but, in short, you can assemble as much or as little information on the main screen. We call these Views. You should try to find a balance between displaying most of the information you need directly to enable accessing the most urgent information fast, and longer loading time because you’re loading too much information at the start, which will slow down your app main screen.
Each user can tune their data type display screens by using Perspectives. Perspectives are saved searches definitions and overridden settings for creating a custom view: a new perspective on your data.
Done: Modify, Rince, Repeat.
You now have a custom application that should fit your need. However, you do not need to have made no mistakes. The platform is very forgiving. At any point, you are free to modify the structure of your application, to update the rights or roles of any user, to modify the name, colors, presentation options. Nearly everything can be updated when you need it changed.
With your new collaboration system, you can hold in a single place all the information you need to inform your decision, based on your own way of working.