App Edition
Editing your app in Simitless is easy. The edition panel can be reached from nearly every screen and your application can be edited in real time. The forms users are currently using will update automatically near instantly.
Edition menu
To open the edition panel, use the app menu. It is normally accessible on the top right-hand side of the screen and has 3 vertical dots . In the menu, you will find a line “ Edit App”.
The app main settings
Simple Options
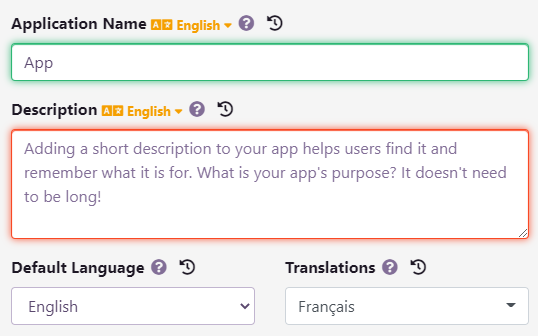
This menu item opens a side drawer on that lets you edit the application details. The main settings include:
- Name, the name of the application that will be displayed everywhere
- Description, this is the application description that will be displayed everywhere it is necessary. For example, in the marketplace, for internal listings. It should explain what the app does and who for. Adding a short description to your app helps users find it and remember what it is for. What is your app’s purpose? It doesn’t need to be long!
- Default language, this is the display language of your application. This is taken from the workspace default language when your app is created. When changing the default language, you may be prompted to choose to migrate the existing content to the new language or if you prefer to keep the current content as it is. It is useful when you input all the type names in English, for example but your app was configured as a French app. You don’t want to have to re-type all of the content that was mistakenly typed in. If you made a mistake and entered French labels under the English language, click “Migrate”. Otherwise, click “Keep” to keep the labels as they were, and simply change the default language, for example, when adding a secondary language to your app but wanting to also change the default language to the new language you are adding.
- Translations, lets you have a secondary language for your application. This is very useful when you have users that speak multiple language, if your company is based in multiple countries, for example.
Translatable content
The translatable content includes:
- Application name
- Application description
- Data types names
- Data types descriptions
- Data types unit labels
- Some of the data types that proposes to select labeled or named values
The data content itself is always the same in every language.
Main App screen
The main app screen lets you add, still from the app edition menu, one or multiple views. Those include:
| App View | Description |
|---|---|
| Lists in boxes |
App main screen, List view  |
| Sun Book |
App main screen, Book view  |
| Tiled |
App main screen, Tiled view  |
| One Data record | displays one record that you select in the settings of this view. This is useful to show a main record that calculates statics for example, or if your app is really simple and has only one record. This is not meant to be changed regularly. |
| One Data Type | displays a default data type. This is mostly when your app has only one main data type that you are expecting to use in most of your interactions. A custom default perspective can also be applied to fully customize this view. |
| Dashboard | displays a default dashboard as the main screen. A dashboard is a collection of graphs. |
| Combined views | enables you to combine your own screen by adding multiple views from this list. Practical to compose a quick-reference screen when you open your app. Please remember that the more things you add to the views, the heavier and slow your app may become. For each sub-view used in the combined views, you can select a screen ratio (in 1/12th increment) that will be used on desktop views to display sub-views side by side: 1/12, 1/6, 1/4, 1/3, 5/12, 1/2, 7/12, 2/3, 3/4, 5/6, 11/12, 1. |
| Tabbed views | enables you to assemble the other views and display them under tabs. This is useful to find a balance between having lots of information available quickly on opening your app and not loading everything at once. |
| Accordion views | enables you to do the same as tabbed views but the interaction is slightly different. An horizontal accordion with folding zones is built rather than the sections being tabs. |
| Buttons | enables you to add direct-action buttons to the main view. You are free to add as many buttons as you want. These buttons can be links toward a data type (main type or subtype), a link towards a specific record (for example, a summary record, year statistics, etc), or towards a pre-defined perspective (data search, filters, presentation type, etc), or event a link towards creating a new blank record of a specific data type. |
App Icon
First and most visible part of the customization you can build in your app, this section lets you upload an app icon. This can be displayed (optionally, see the app settings) in all of your application’s page’s footers. It is also used to present your application on the workspace page listing all your workspace’s applications and it will be displayed as well on the welcome screen of any open app. This icon may then be presented to the public if your app allows it in its settings.
Any web-compatible image file is accepted in this field. The size of the file counts towards your file quota. By default, a small free file quota is included in your workspace to enable you to add icons. The maximum size for an app icon is 2MB. This should be largely enough as they are displayed in a square of 500 pixels maximum.
Open access settings
App open access settings
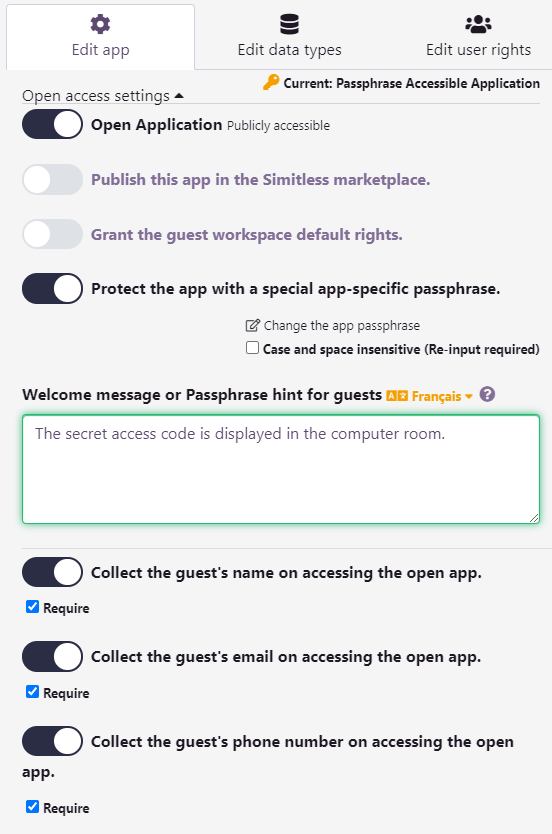
On Simitless, you have the option de open up your applications to the world. This means the public could have access to the data of your application if you decide so. To proceed and share your application data and access securely, open the “Open access settings” accordion in the application settings. Once you enable “Open Application”, you will be prompted for some information, if it has not been configured in the workspace yet.
Open application requires the following information to be configured in your workspace:
- main postal address (legal requirement),
- website address (for your users and for your marketing),
- Support contact (legal requirement, but for your users as well).
Once the application is marked as open, it is immediately available to the world. You can however tune the following options:
- Publish in the marketplace, to list your application in the Simitless Marketplace,
- Grant workspace rights, to let users join the workspace (and eventually view other apps that are listed in the workspace) when they join the app itself,
- Protect the open app with a special app-specific passphrase, to lock your app only to users knowing or able to guess a secret passphrase,
- A welcome message or a passphrase hint, in order to give a hint to users so they can guess the passphrase, or simply to welcome them in.
Passphrase protected open app

When your application is open, you can also ask the platform to collect some information for you, from the user, before the user is granted access to you app. You have the choice to mark any of these fields required or optional in order to grant the user access to your open app: “Name”, “Email Address”, “Phone Number”.
When an app is not open, you have an option to “list this app in the workspace”, so that users can request membership without being invited. This option is removed and activated by default when your app is open. With this option, users that have been added to your workspace (either manually or automatically through joining another app), can see the existance of other apps and are presented with a button to request an access. The application or workspace administrator will still have to validate every request in the user management area.
Help and communication options
This settings accordion contains only one option for now: “Get tips and suggestions to improve my app”. This option, activated by default, is proposed to serve at a later date. The Simitless development crew is working on additional features that would automatically analyze your apps and propose improvement to you. This is not enabled yet, but you have the option to be informed when it will be. You will always be able to deactivate this option later at any point. For now, it does nothing.
App visual screen options
To further customize your app, your can fine-tune additional visual options in the app settings, under the “App Visual Screen Options” accordion, you will find a few options:
- Hide breadcrumbs, to remove the top navigation bar that is present on all of your app screens,
- Hide footer, to remove the bottom footer bar that is present on all of your app screens
- Use the app own icon instead of the workspace icon or the Simitless icon, to make your apps more “Whitelabeled”,
- Use a custom branding color, to define a color (65 millions choices!) theme and enable instant environment recognition by users,
- Keep the breadcrumbs bar in greyscale tones even with an app color defined, in case the color you defined becomes overwhelming and you just want some subtle hints of color in your app, not everything in that color.
Note: Enabling the “Hide footer” option disables the use of the icon in the footer as the footer is never shown. Enabling the “Hide breadcrumb navigation” disables the greyscale tone option as the header is then never shown.
Optional Simitless features
Simitless proposes additional features for your applications. They are not activated by default, as to not confuse new users, but can be activated upon request. These include:
Because these features are experimental and incomplete, we don’t let users activate all of them by themselves. Contact us if you want to experiment with us and to discuss your need for them: https://contact.simitless.com.
Importing and exporting
Export
The export feature lets you download a zip archive with the content of your app:
- Data, including structure, configuration and content in the JSON format;
- Data history, the previous values for each field in your form (based on data retention currently in the Simitless policies);
- Files that have been uploaded to the Simitless platform. The file name and information will also be referenced in the data structure.
With Simitless, you can get back all of your data: Your data, your rights.
Import
The import features allows you to clone an existing app into a new space or to restore an app that was designed in Simitless.
When clicking on the import in App button, you will be prompted to select a file. Simitless export files usually bear the extensions “.simitless.zip”. Once this file is loaded, the import process will ask you to select the elements you want to import. You can choose to only partially import the structure of an application.
Across updates, app archives may become incompatible or partially compatible. For best results, you should only use recent Simitless app archives to import into the system.
Deleting your app
At the bottom of the settings form, one field indicates “Delete the application and its content”. To request the deletion of this application, including all of the data, workflow definitions, landing page, and products, type the app name over the placeholder and click Delete App. For security reasons, this form require you to type (or paste) the name of the application. This name is still suggested as a placeholder to the input field but you need to re-type it in. And to avoid accidental deletion (as this is not reversible), this form does not let you validate using the “return/enter” key of your keyboard unless you focus on the button first.
Once you click the button, a confirmation box checks, again, with you the action of deleting the application. This should be safe and secure!
Note: Depending on circumstances, you may not be allowed to delete an app if there are other users that paid to access it. You have a service provider contract towards these users. In this case, you will need to address cancelling the users subscriptions and you will have to deal with eventually refunding the users, depending on the subscription contract, prior to deleting the application.
Advanced Options
For advanced users and developers, the platform provide additional settings that enable technically complex operations that may not be within the reach of normal users.
Email Sending
A bit of background
In computing, especially on the internet, we use multiple computers that are interconnected and given a specific role. Your email system is actually composed of multiple of these computers with a specific job. Your email client is just a piece of software connecting to two different type of servers. To receive email, the server is called a POP or IMAP server, two complementary/competing inbox standards that handle your incoming emails. To send emails, you user a SMTP server.
The job of this server is to handle the communication but also the security of sending emails. In the distant past, SMTP severs were open and everybody could use them based on trust, but then spam messages were invented and abusers come through to sell you pills and tell you that you won a few million dollars… So email sending security was invented and you now need to sign in a secure email sending server that authentify itself and performs a bunch of complex declarations. As this is complex and can be expensive to do, this is why now you have quotas to send emails in your free email box.
If you are trying to send an email to more than 50 contacts, this will usually be a problem with free email providers. Some email software don’t support well such a massive automated send. For example, Gmail struggles after 10000 characters (~200 email addresses) on Chrome and anyways, set a limit to (500 recipients per day maximum), Outlook has a maximum of 2000 characters (~60 email addresses) on windows and Apple mail limits to 500 recipients a day as well.
Professional marketing email providers are your best option to not have a sending limitation. Simitless will let you use free providers in the email sending settings but we won’t be able to go around their limitations! We suggest subscribing to a well known email sending service provider such as Mailjet, MailGun, Sendgrid or https://relai-smtp.com/ (French provider, in French only).
What is it all for?
You can add a smtp relay server to bulk send emails through the Simitless platform. Configuring a server enables additional features around email such as sending an email one-by-one to many recipients automatically. This is particularly useful when creating CRM, *RM, Marketing or ERP apps. Sending to each person individually rather than using “cc” improves the deliverability (less spam folder) and increases engagement (users opening and eventually acting on the message).
Setting things up
To configure the SMTP Server settings, you simply need 4 parameters:
- SMTP Server url,
- SMTP port (typically 25, 2525, 465 or 587) – 2525 or 587 are prefered for modern use,
- the username for your SMTP provider account (in some cases it is just “apikey”, with the actual key input in the password field),
- the password (or api key) for your SMTP provider account.
Note: Unlike most of the settings on Simitless, the SMTP form needs you to click the Save button.
Custom CSS
CSS is the abbreviation for Cascading Style Sheet. This is the programing language that defines the way things are presented on the screen.
Even though this is a “no-code” platform, the Simitless platfrom attempts to propose a clean and consistent class system for developers to fine-tune the display of their app and offer maximum customizability. If you have a web developer, they can customize the look of your apps. This feature is for developers only as it is technically quite advanced.
Here is an extract of the classes you will be able to find by exploring the code generated by your apps in the developer environment of your browser. The entire platform is based on a customized version of the “Bootstrap” library.
| CSS class | Usage |
|---|---|
|
Container for the app general screen layout |
|
Container for the app breadcrumb header |
|
Container for the app content |
|
classes for the data elements |
|
Button for the tree button of the data structure |
|
Title of the data item being displayed |
|
Buttons to control actions on the data |
|
Button to trigger data upload |
|
Button and options to manage search and perspectives |
|
Buttons to add and manage filters |
|
Button to show more action buttons (mostly on mobile views, when buttons are collapsed to clear up some screen space) |
|
Button to show more options such as perspective management, graph button |
|
Modal view data container |
|
Container for a data form |
|
Container for the header of the data form |
|
Container for each data field in the data form |
|
Container for the footer of the data form |
|
Differentiator for each data type field in the data form |
|
Unique identifier for the data field of a specific record |
|
Container for the license logo and link |
|
Container for the application footer |
Note: Unlike most of the settings on Simitless, the custom CSS form needs you to click the Save button.