Workspaces
Workspaces contains applications. They let you share multiple applications between users.
Workspaces are designed to be a container for applications. They are perfect, for example, to share your applications within your team, within your workgroup, or within your organization.
The user creating the workspace is typically the user responsible for setting up everything: apps, quotas, users, billing. The responsibility can be transferred or delegated to other users as needed. Within a workspace, the quotas are mutualized between all the applications. This allows more flexibility and usually quite substantial savings at the user quotas level.
Edition
A workspace may be created automatically if you create a new app from a template and no workspace have been already selected. In this case, the workspace may not have a name. A special link under the generic name “Workspace” let’s you access the settings to (re)name your workspace.
The default URL for your workspace and application is generated using your workspace name. Until you define a custom name, the internal identifier for the workspace will be used in the URL. This is not as friendly to you or your users to access the applications.
To access the edition section of your workspace, when you are on your main workspace page (the list of applications), click on the spanner icon on the top right-hand side corner of your screen. This opens a right-hand side drawer with a form to edit the workspace settings.
In Simitless, no need to search for a save button for most operations. Everything is saved automatically as you are editing it.
Settings
All of the workspace settings are optional, if you don’t put any value, the platform will find some way to make it work anyway. Some settings may be legally required for you to provide, depending on the use you do of our platform’s tools. This is the case for example for a support contact and a postal address when you are providing a service to the public (public access applications, responsibility of the content editor, etc.). This also depends on the jurisdiction applying to you and your applications. In any case your T&C apply and you are responsible for your content.
The main settings for your workspace are:
- Workspace Name. This is the workspace name that will be used in your applications (menus, internal emails, forms, urls). It does not have to be formal. It can be your company name or a team name.
- Main Postal Address. This is your legal address. This is used for statistics, for administration and for presenting to your users, but also for the personalization of recommendations by the Simitless platform.
- Website Address. This is used for various links through the application. For example, we add a link to your website address along the list of apps on the main screen of your workspace.
- Support contact. This box lets you provide users of the apps in this workspace the contact details of the support provider. This could be the name, phone, email, etc…
- Default Language. This is the default language of your workspace. Apps created in this workspace will be by default set to this language. Applications can have multiple language (one main language plus some translations), but workspaces require to have a default language. By default, this is the language of the account of the user that created the workspace, at the time of creation.
Finally, the workspace let’s you upload an icon, to be used as your workspace icon. Any web-compatible image file is accepted in this field. The size of the file counts towards your file quota. By default, a small free file quota is included in your workspace to enable you to add icons. The maximum size for a workspace icon is 2MB. This should be largely enough as they are displayed in a square of 500 pixels maximum.
Adding an icon to your workspace let’s you activate a “whitelabel” feature. This hides the Simitless logo from the footer of your application and is quite practical for your own brand to shine through to your users.
Deleting
To delete a workspace, proceed to open the settings page of the workspace: click on the spanner icon on the top right-hand side corner of the workspace main screen. At the bottom of the settings form, one field indicates “Delete Workspace”. To request the deletion of this workspace’s account, including all of the applications, data, workflow definitions, landing pages, and products, type the workspace name over the placeholder and click Delete Workspace. For security reasons, this form require you to type (or paste) the name of the workspace. This name is still suggested as a placeholder to the input field. And to avoid accidental deletion (this is not reversible), this form does not let you validate using the “return/enter” key of your keyboard unless you focus on the button first.
Once you click the button, a confirmation box checks, again, with you the action of deleting the workspace. This should be a safe and secure action!
Plan
Workspaces are the container of apps that counts for the billing purpose as well as for your quotas use. Multiple apps can be covered by a single subscription as long as they are in the same workspace. This enables you to save up with the scale pricing, as well as to mutualize the quotas you use across multiple applications.
Flexibility
The flexible sharing of quotas across apps is key for the scalability and flexible use offered on Simitless. We don’t believe in undercharging a flat fee just to trigger impulse buy and letting investors pick up the tab. We don’t believe in overcharging either once investors need their money back (+ interests). We believe in fair prices for everyone.
We designed Simitless’s pricing to be flexible to align with the value of the service provided by the software. We have committed ourselves to keep the prices as fair as possible to, on the one hand, be able to make a decent and independent living from our work without having to produce exorbitant margins intended for passive investors, and, on the other hand, to be affordable for small businesses. What is of paramount importance to us is a steady and natural evolution of the practices of our customers. We firmly believe that the proper implementation of software is supposed to save our users time and reduce such risks as data loss to the organization. Good software should cost less than what it would cost a company to operate without it.
– Extract from our article on The price of software
With the Simitless platform at your disposal, you can now create for yourself (almost) custom software at off-the-shelf software prices.
Simitless software is:
- a risk-free solution - you only pay when you use it, and we even give you a small quota of data you can input to test the platform for free;
- an affordable solution - since our prices are based on your particular volume of data, files, and users, you only pay for what you estimate you need for your applications;
- an adaptable solution - you can reduce or increase your quotas without prior notice, without confirmation, without difficulties at any time.
Simitless is a tailor-made solution for the price of off-the-shelf software. There are no surprises, no pulled-out-of-thin-air pricing. All our prices and as well as an instant cost calculator are readily available at https://pricing.simitless.com.
Values, Files, Seats, what is it?
Simitless pricing is using 3 type of measurement: data, files and seats.
- A Value, or previously called a “Data Point” is one the value of one box of information. For example, if you were to hold your entire database in a spreadsheet, one cell of your spreadsheet is one Value.
- Files can take a lot of space and are structurally different to other data. This is why they are storing them separately in their own optimized and secured system.
- “Seats” or “User Sessions” typically refer to the number of users that can be connected in parallel to the applications you create. Users who have exceeded their quota will have to wait for somebody to disconnect from the application in order to be able to access the application. This way of counting allows you to have accounts for people using your app punctually without having to pay for each user. (Just to be clear, if one user account connects twice to the same app, it still counts as two connections!)
How will my change of plan proceed?
Plans are applied with a period of time that you choose. If you upgrade or downgrade, the remaining time left on your current plan will be credited on your account toward your new plan. You have no obligation and you can interrupt your subscription at any time but any amount paid is never refunded.
How do I do if I need more?
Our systems can handle much more volume. Let’s talk about custom pricing. Just get in touch so we can set it up together: https://contact.simitless.com/.
How is the price calculated?
When you request a specific quota on the workspace plan settings, this value is decomposed into options that we have defined. The price is degressive so you the bigger your apps, the more you save on additional volume. You can find the details of the pricing tables used for the calculations on our pricing page https://pricing.simitless.com
Billing account
The billing account is the user account responsible for settling any cost associated with the applications created within the workspace. The existing billing user can invite another user to take over the billing responsibility by clicking the icon on the user management page.
Access management
Access rights and roles in Simitless are very granular. This means it can be finely tuned to match the exact access requirement for each user of your applications.
Access rights
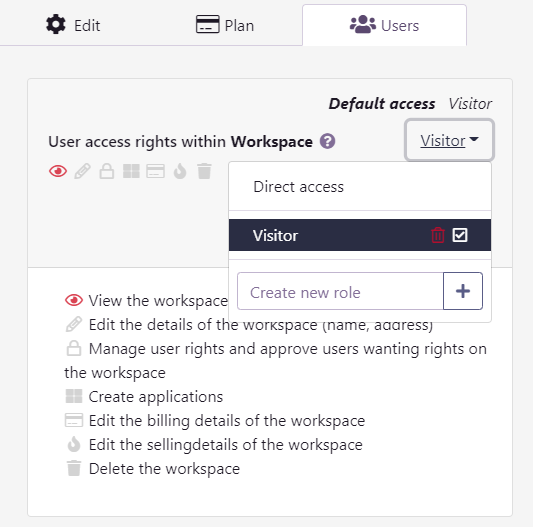
Access rights are defined by the platform in terms of what a user can do with the workspace. The access rights that can be enabled or disabled are:
- View the workspace
- Edit the details of the workspace (name, address)
- Manage user rights and approve users wanting rights on the workspace
- Create applications
- Edit the billing details of the workspace
- Edit the selling details of the workspace
- Delete the workspace
Access rights can be granted by default to a user or after a user is given access to a workspace. Access rights are granted to users on an individual basis.
To manage access more globally, the administrator of a workspace can create roles.
Workspace default access rights and roles
Access roles
Roles are a collection of access rights that apply to users. They can be granted by default or added to a user after the user is given access to a workspace.
Access roles can be defined by the workspace creator as well as any user with the “ Manage user rights and approve users wanting rights on the workspace” right. In the menu for the “Default access” definition, a mini-form let’s you type in a role name. Click the to create a new role and add rights to this role after you select it in the menu.
Default access rights
The default access rights will be granted to users with the selected role in your application. Those should be the basic access rights that everybody using your application should have.
You can add default access rights for new users in 2 ways :
- Direct access: select the icons corresponding to the rights you want to grant to the new users arriving in your workspace
- Roles: tick the box next to the name of the role you created in the workspace, in the default access zone.
Default rights and roles are added to users when they join the workspace. Changing the default rights are not changing any of the existing user rights. Roles are granted to users the same way, however, rights that are defined in roles will change the access level of users that currently hold this role.
Workspace Invitation email prompt

Invitations
The invitation box lets you send an email invite to any email address, whether they are existing users or new ones. The platform will send an email with a code to the new user. They are free to reclaim the invitation with the account of their choice as long as they can provide the email address the invitation was sent to and the invitation code. If the email address you sent the invitation to is associated with an account and validated on the platform, the user will be shown the invitation and a notification directly in their Simitless account.
Workspace Invitation
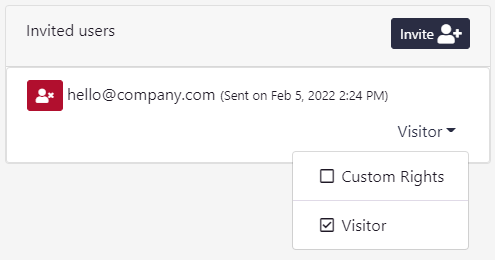
To send an invitation, click on the button Invite . An invitation is created with the default access rights and roles.
You can modify the access rights and roles offered in the invitation until the user reclaims the invitation. After that, the user is a member of the workspace. You can then handle their rights directly in the user management section. You can revoke the invitation at any time, before it is reclaimed. The user will be notified of the change and won’t be able to reclaim the invitation.
User Management
The user management section of your workspace edition lets you view the complete list of workspace members. Each user has a line with:
Workspace User Management

- their name to identify them (hovering with your mouse over their name on the web desktop view also shows you their username);
- a button to remove them from the user list (all rights are then removed);
- a dropdown to select roles or custom rights;
- a “view Custom Rights” link to display the custom rights icons to toggle them for this user;
- a column with a star to invite the user to take over the billing responsibility for this workspace.
Billing User Transfer
Some of the columns or information might not be available to all users, if they don’t have access to it. For example, only the current billing user will be able to see the star column on other user records as they are the only one that can transfer the responsibility they hold. If ever you get stuck with that, you can always reach out so that we can perform manual checks in order to solve your issue.
Central apps management
In each of the sections of the workspace user access management (default rights, invitations and user management), you’ll maybe notice a small “Show apps ” link. This enables you to centrally manage the corresponding information for each of the applications within the workspace. Each application has their own page to manage user access but to make it easier, we have grouped the settings on the workspace page as well.
One of the most practical effect of this is that when you add a user to the workspace, you can grant them access to each application without needing to navigate to each of the application user access management page.